Overview
1 Examine & Create Campaign Package
2 Create Campaign Gateway Distribution List
3 Create & Launch Campaign
4 Docker Monitor
In our Final Lesson, you will learn how Pulse Campaign Packages are created and deployed over the air to our Pulse Managed Gateways.
The Campaign that you will be using
- Installs Docker on your Gateway (if it is not already present)
- Distributes a Bash Script that Monitors Dockers Containers
- Creates a Linux Service to automatically run the Bash Script
Let’s get started.
Examine & Create Campaign Package
1 SSH to your Virtual Gateway (local Ubuntu Virtual Machine using MacOS Terminal or Windows Putty Client)
ssh username@[IP address]

2 su up
sudo su

3 Let’s verify that Docker is not installed yet
docker
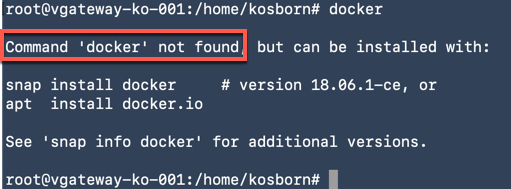
4 Campaign files were loaded on your vGateway when you ran vGatewayPrep.sh earlier. Change into the Campaign directory using the following command (replace ‘kosborn’ with your username)
cd /home/kosborn/workshop/campaign

5 Issue an ls command to examine the directory contents (these are lowercase ‘l’s, not the number 1)
ll

6 Here is an explanation of each file
dockermonitor-configure.sh : Bash script that checks for Docker (installs if not present) and copies the dockermonitor.service and dockermonitor.sh files to their proper locations
dockermonitor-install.yaml : This is the Campaign manifest file which is used by package-cli to create a Pulse Campaign Package.
dockermonitor.service : linux service descriptor file that automatically starts dockermonitor.sh
dockermonitor.sh : Bash Script that monitors Docker Containers, registers/removes them as Connected Things in Pulse and sends Data that is displayed in the Pulse Console (System Properties/Metrics)
package-cli : Command Line Utility used to create and upload Pulse Campaign Packages. It is primarily made available for download via the Pulse Console (Gear Icon\Downloads)
readme : readme file describing purpose of Campaign
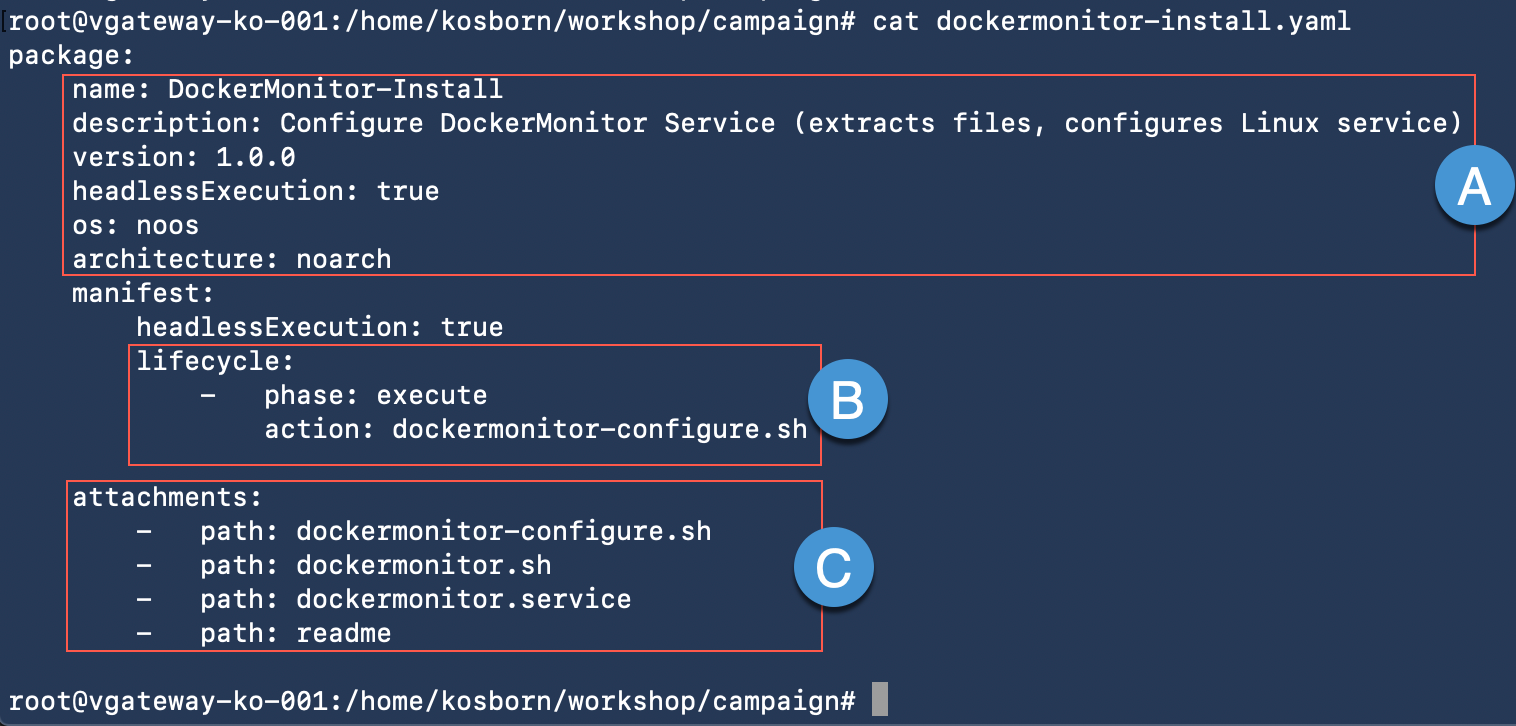
7 Let’s examine the contents of the Manifest file
cat dockermonitor-install.yaml
8A In this section we define the Campaign name and description. We can also set headless execution flags as well as utilize safeguards to prevent the Campaign package from running on the wrong Operating System (OS) or CPU (architecture) type.
8B The lifecycle portion of the Campaign can call multiple scripts if desired (Verify/Execute/Activate, etc.). In this case, we only have an execute phase that calls the dockermonitor-configure.sh script
8B These are the Attachments files that get bundled into the Campaign package when you run the package-cli utility. In this case, we are bundling in two Bash Scripts, a Linux Service Descriptor and readme file. (If we were updating firmware, we could include things like firmware-version.bin files as another example).
9 We will now create the Campaign Package by running package-cli and passing in the manifest (.yaml) file. First, we need to make package-cli executable
chmod +x package-cli

10 Create the Campaign Package
./package-cli package create dockermonitor-install.yaml

11A Issue an ll command and notice that we now have a Pulse Campaign Package (.iotcp ‘iot center package’ extension) file present
ll

12 At this point, we would normally use package-cli to upload the iotcp (package) via the Pulse Console (or, use the Pulse Console UI via Web Browser to upload the file); however, in our Lab environment we have already uploaded the Campaign Package file for you. Let’s move back to the Pulse Console next.
Create Campaign Gateway Distribution List
In this Lesson, we will create a Campaign Distribution List that targets your Virtual Gateway for package distribution
1 Login to Pulse Console if you are not already (link)
2 Username: [First Name Initial][Last Name]@pulse.local
Password: VMware1!
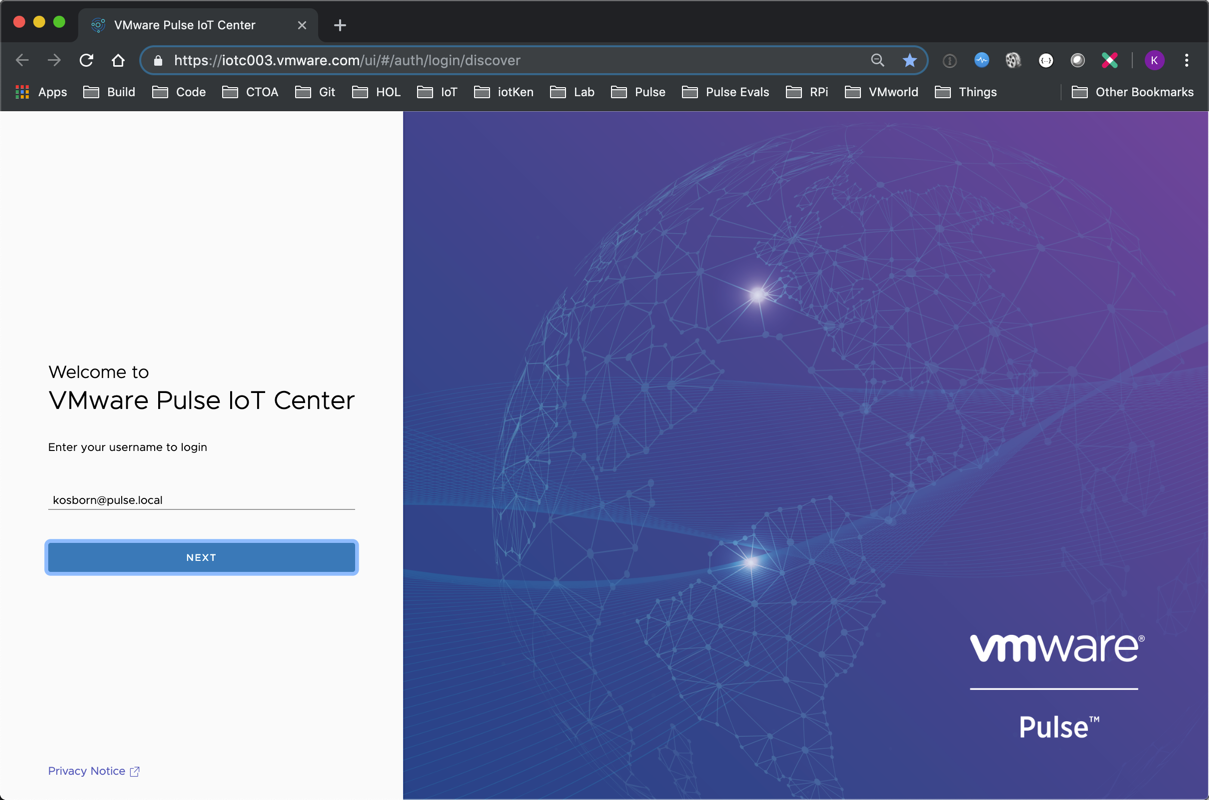
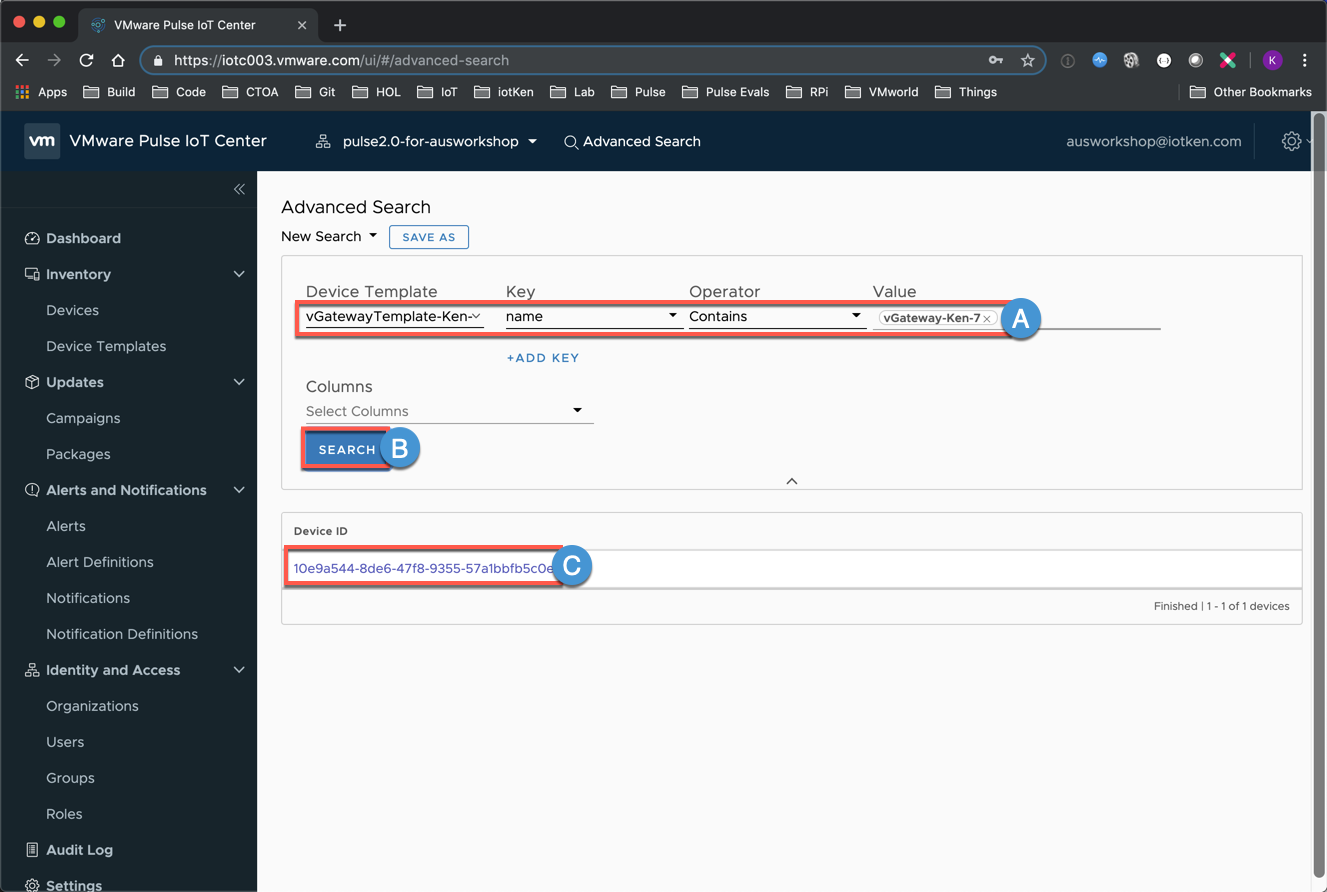
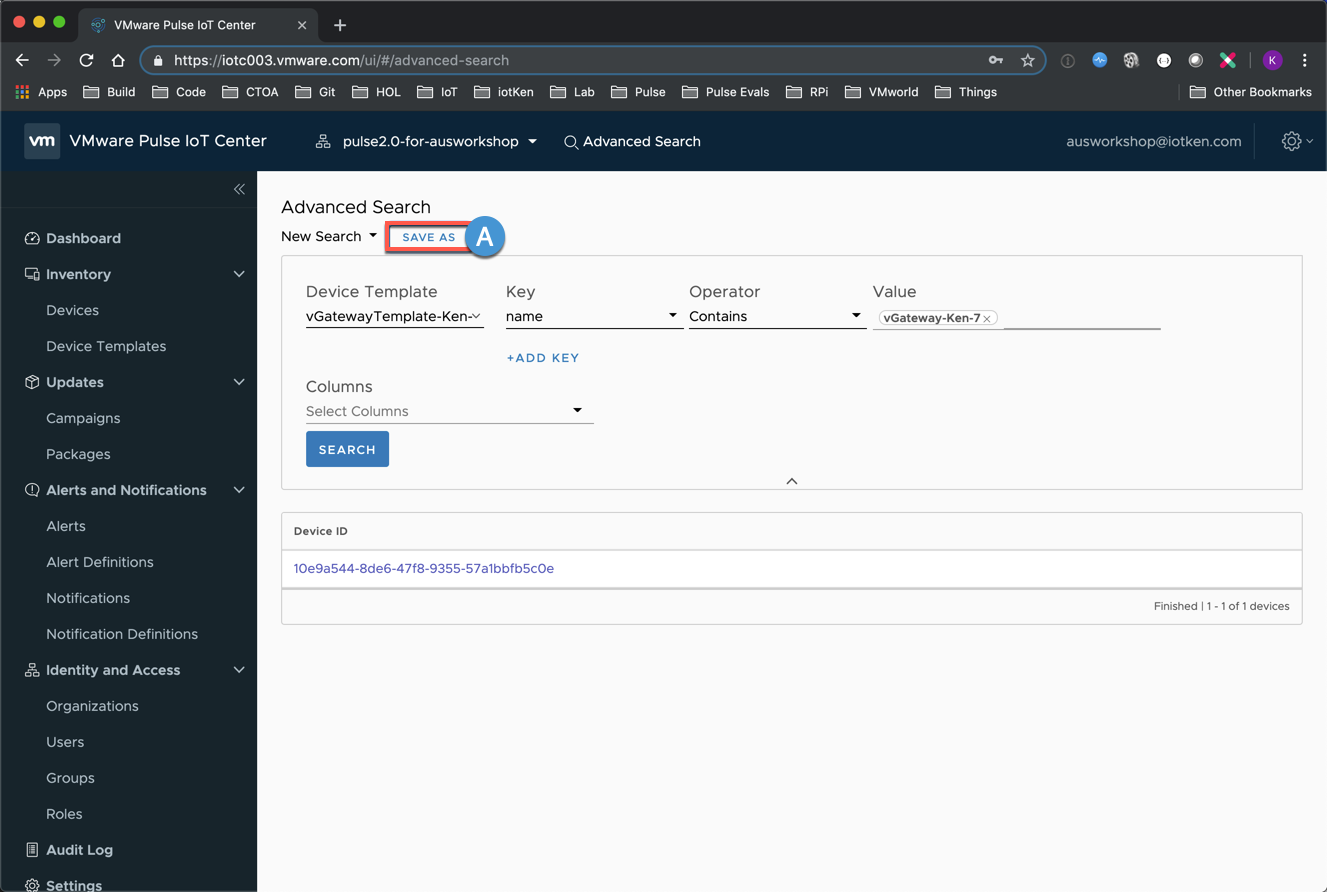
3A Click Advanced Search

4A Build out your Distribution List query
Device Template : vGatewayTemplate-[YourFirstName]-[Number]
Key : name
Operator : Contains
Value : vGateway-[YourFirstName]-[Number]
4B Click SEARCH
4C Make sure there is a Device ID search result
5A Click SAVE AS
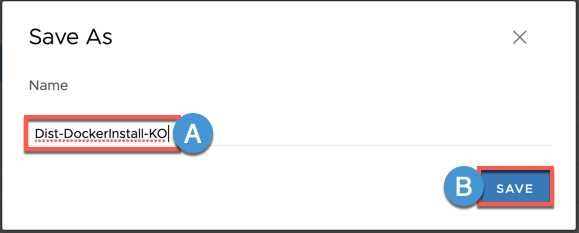
6A Enter Name : Dist-DockerInstall-[YourInitials]
6B Click SAVE
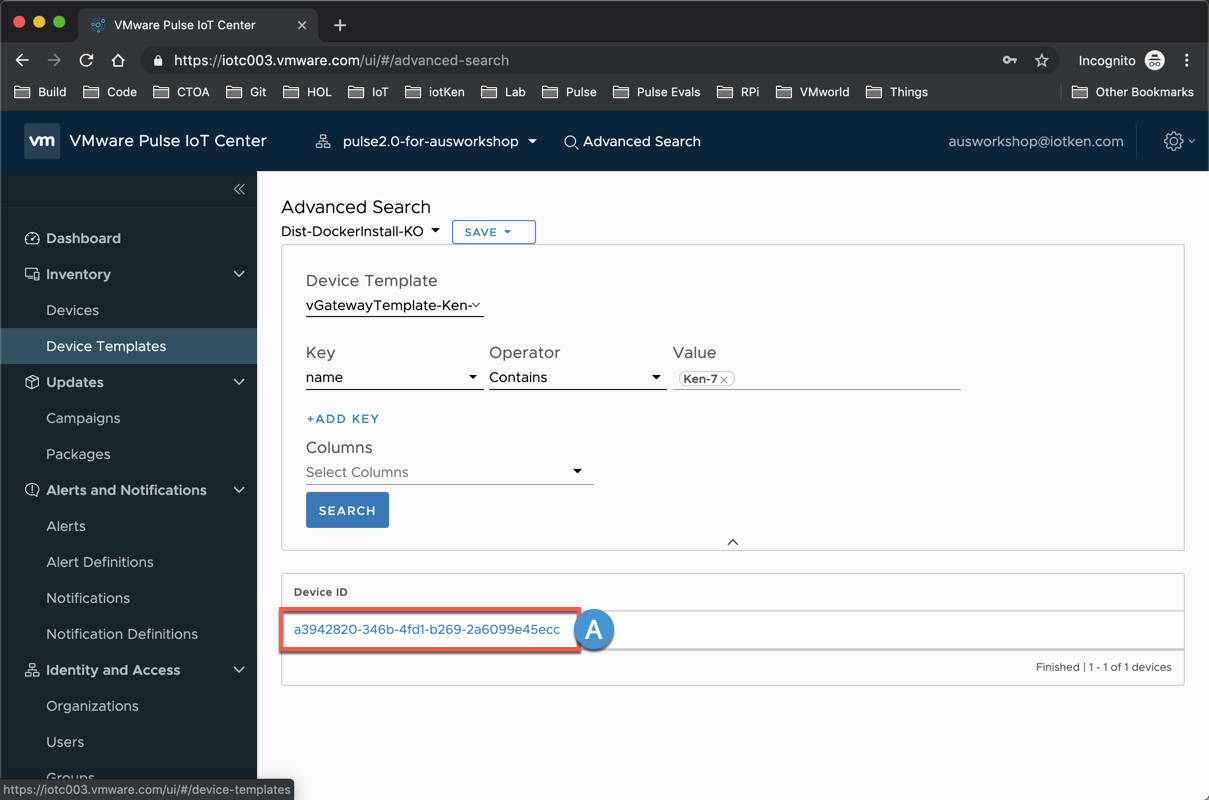
7A Click on the Device ID Search result and verify that it is your Gateway
Create & Launch Campaign
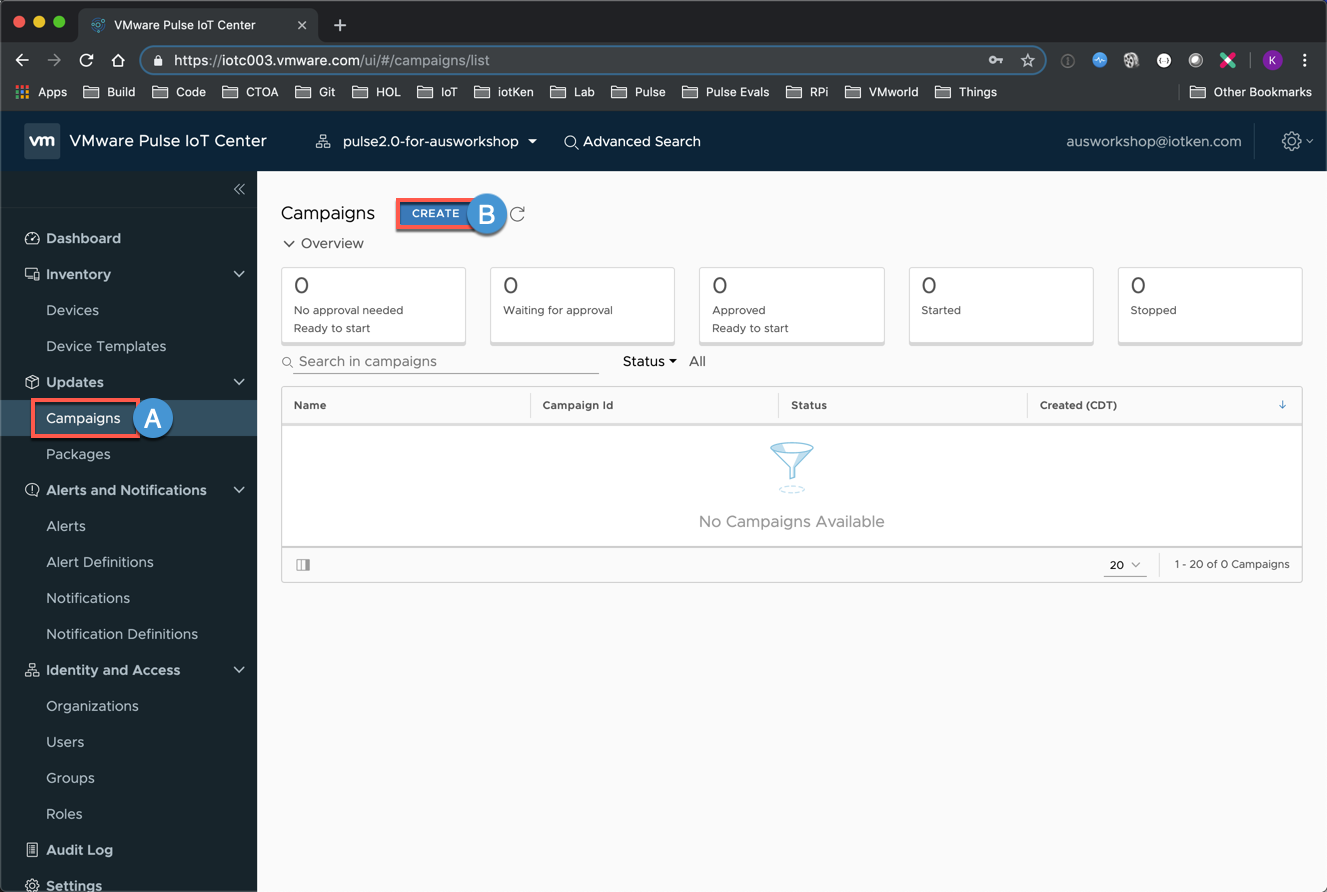
1A Select Campaigns
1B Click CREATE
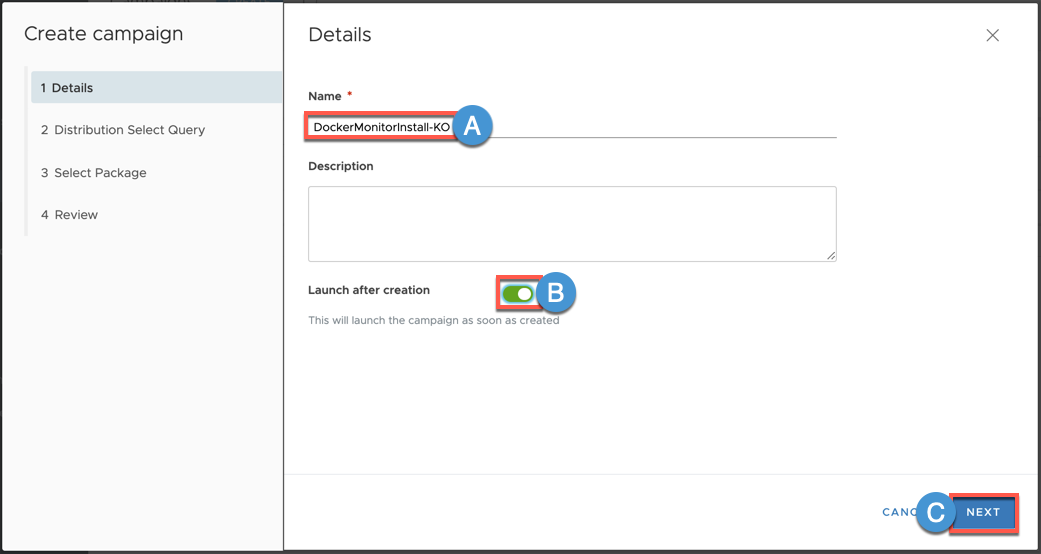
2A Name : DockerMonitorInstall-[YourInitials]
2B Launch after creation : Enabled (Campaign will start as soon as you finish this wizard)
2C Click NEXT
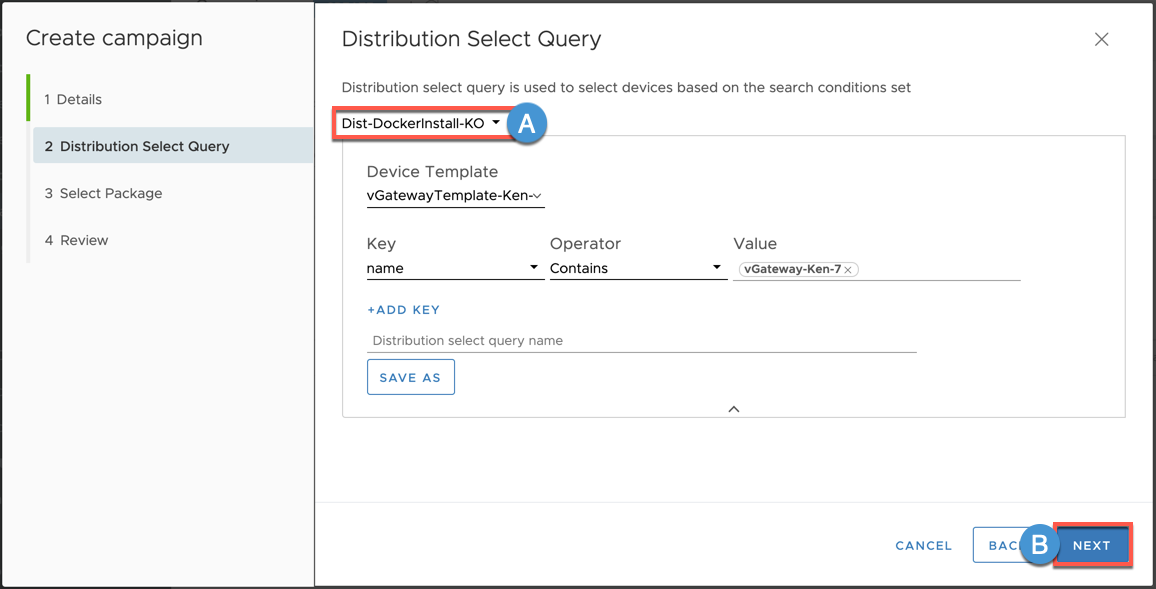
3A Select your Distribution List : Dist-DockerInstall-[YourInitials]
3B Click NEXT
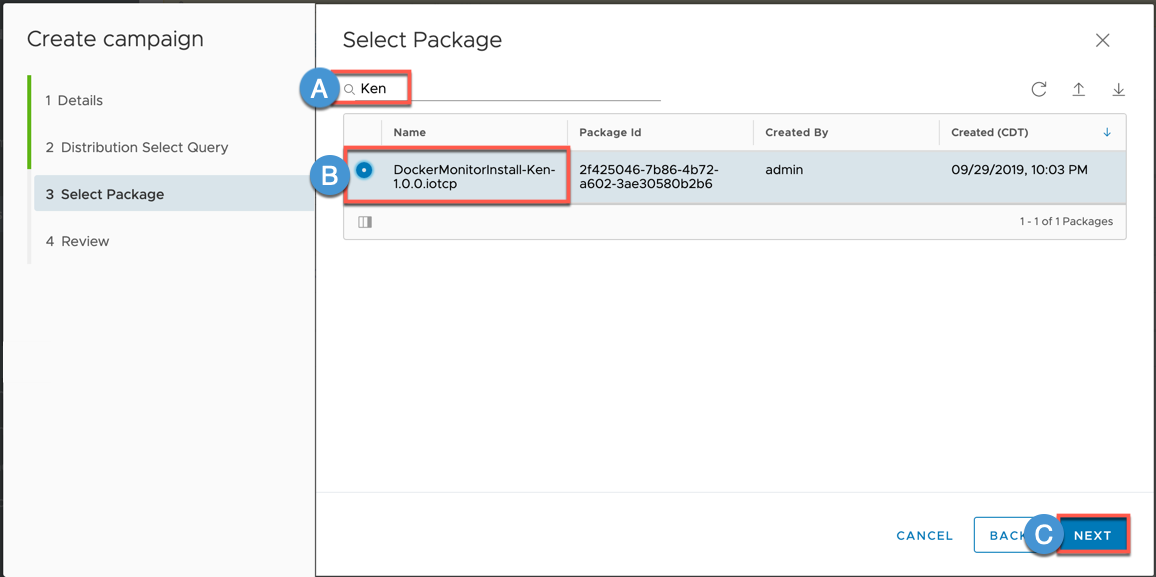
4A Enter your First Name in the Search Field
4B Select the DockerMonitorInstall-[Your Name] package
4C Click NEXT
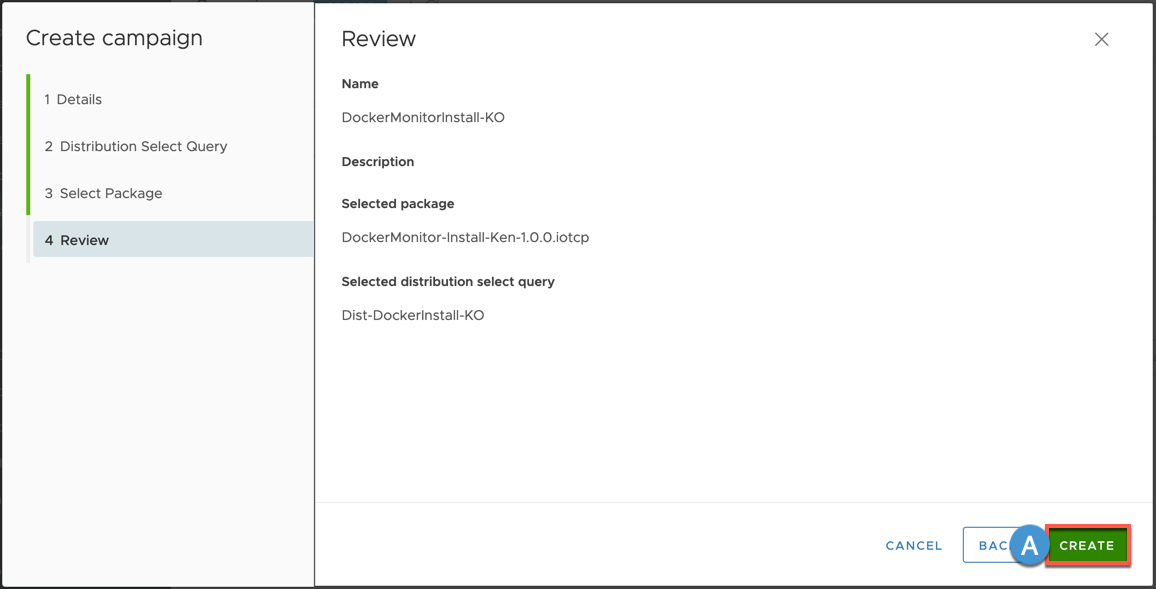
5A Review and click CREATE
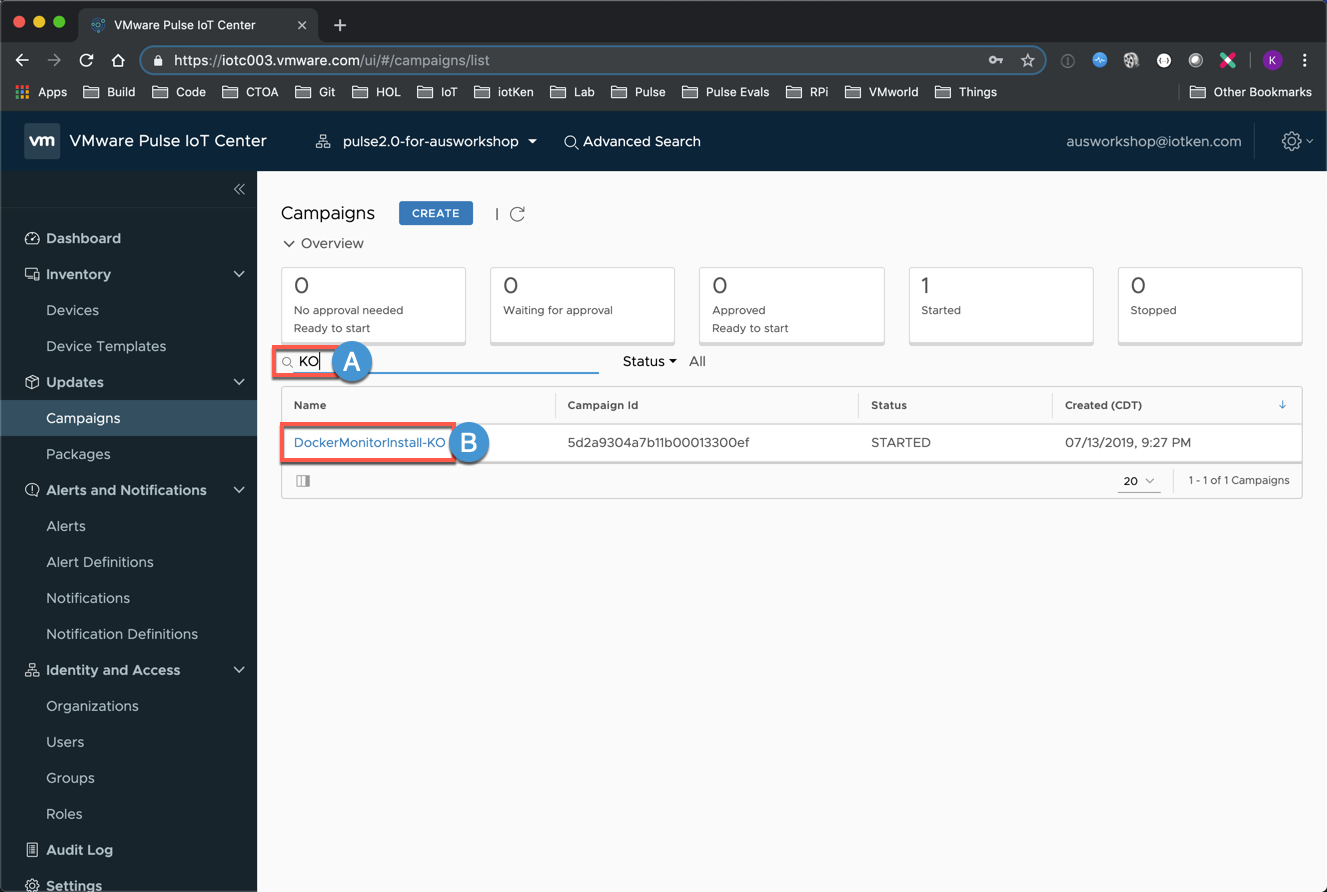
6A Enter your Initials in the Search Field
6B Click your DockerMonitorInstall-[YourInitials] Campaign
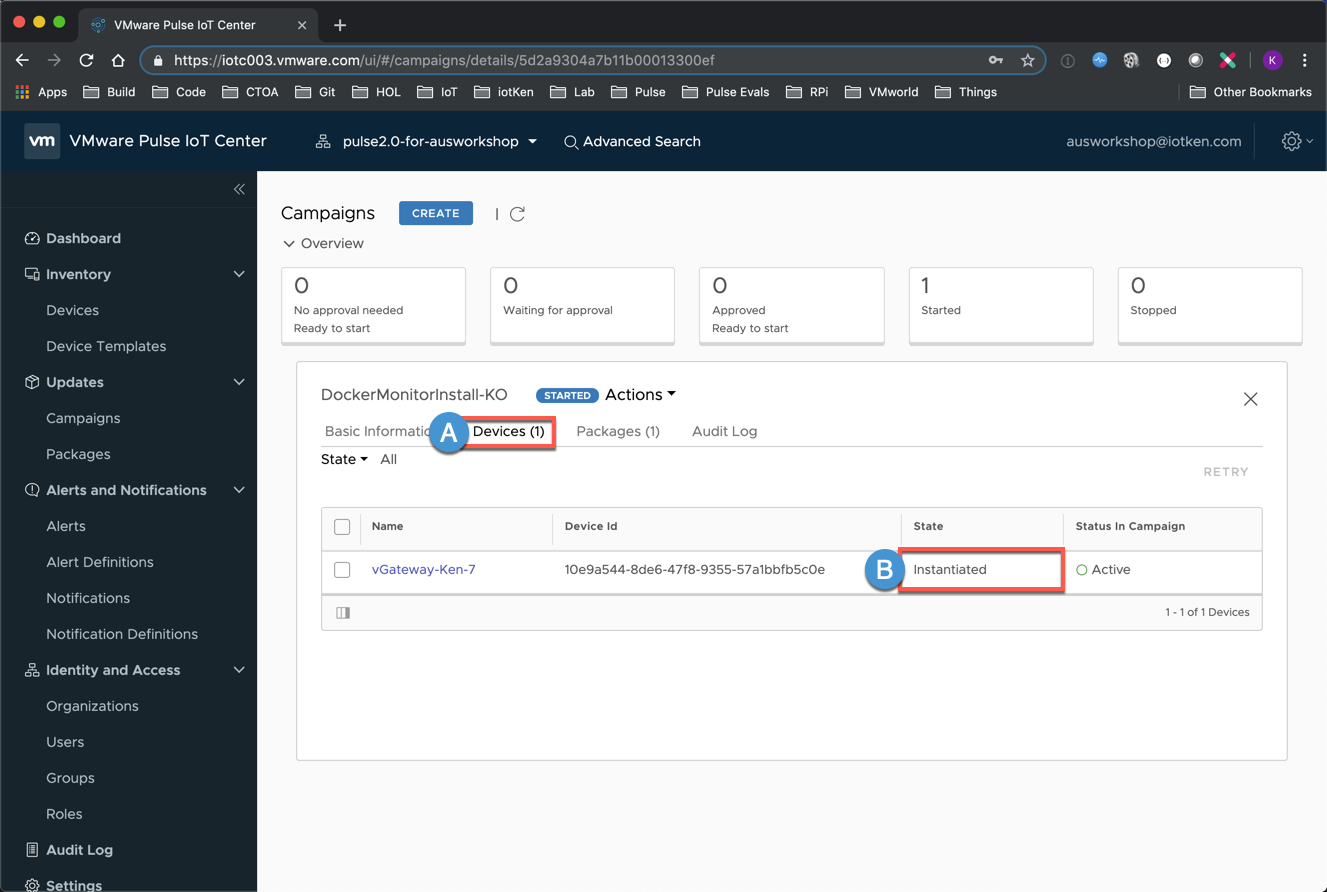
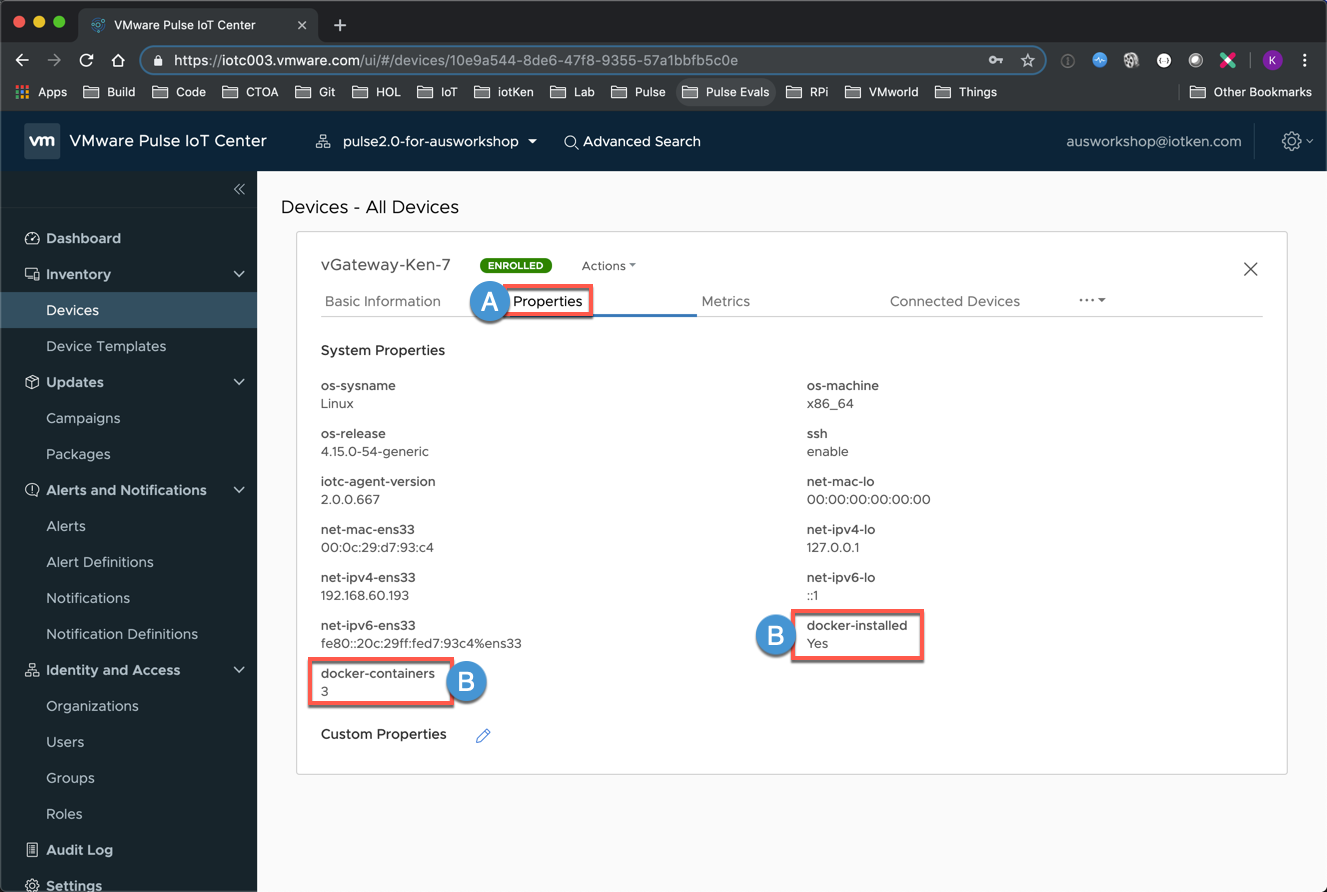
7A Click Devices (1)
7B Notice the State of the Campaign for your vGateway is being reported. The Campaign will cycle through the various Lifecycle states until it reaches completion.
8 Return to your SSH session and run the following commands to force your Gateway to phone home for its next Campaign State check (vs. having to wait the default 5 Minutes for each phase)(replace ‘username’ with your name)
cd /home/username/workshop
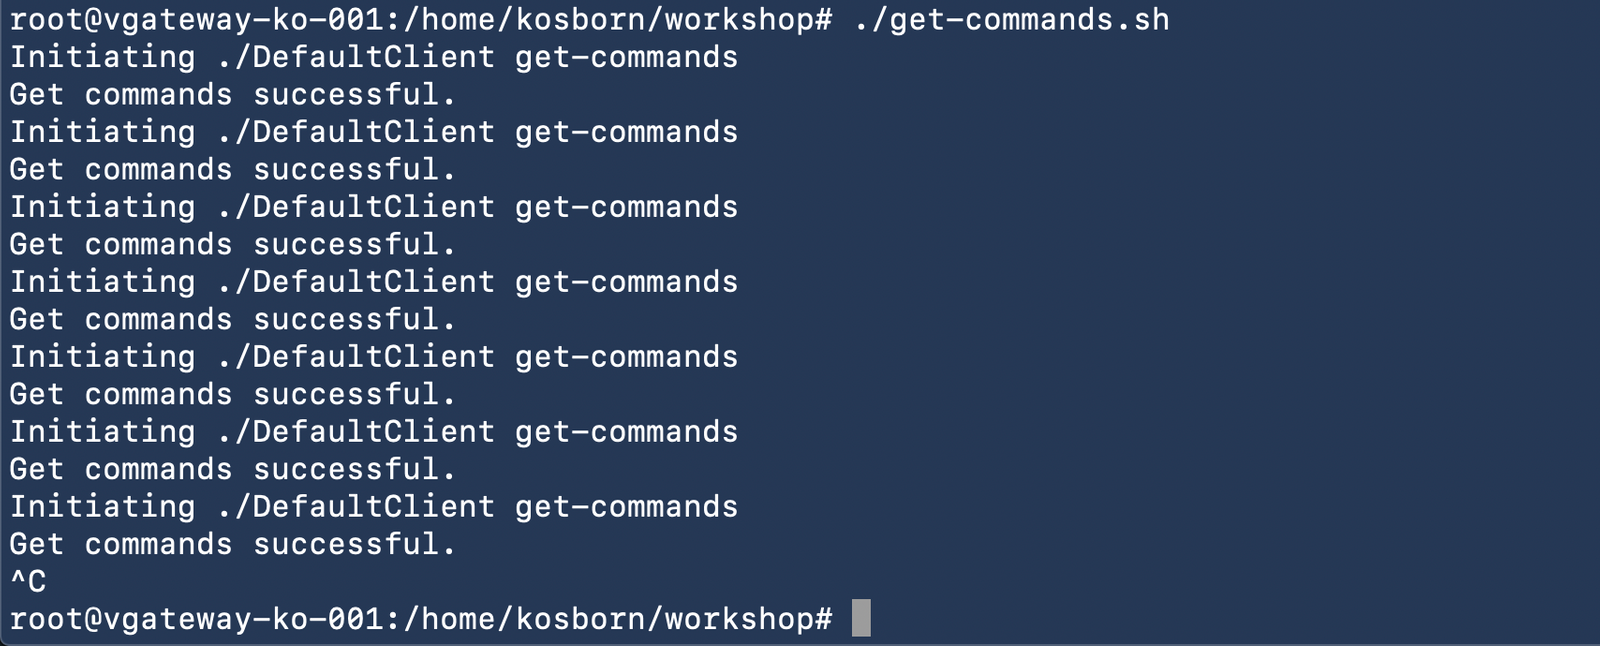
./get-commands.sh

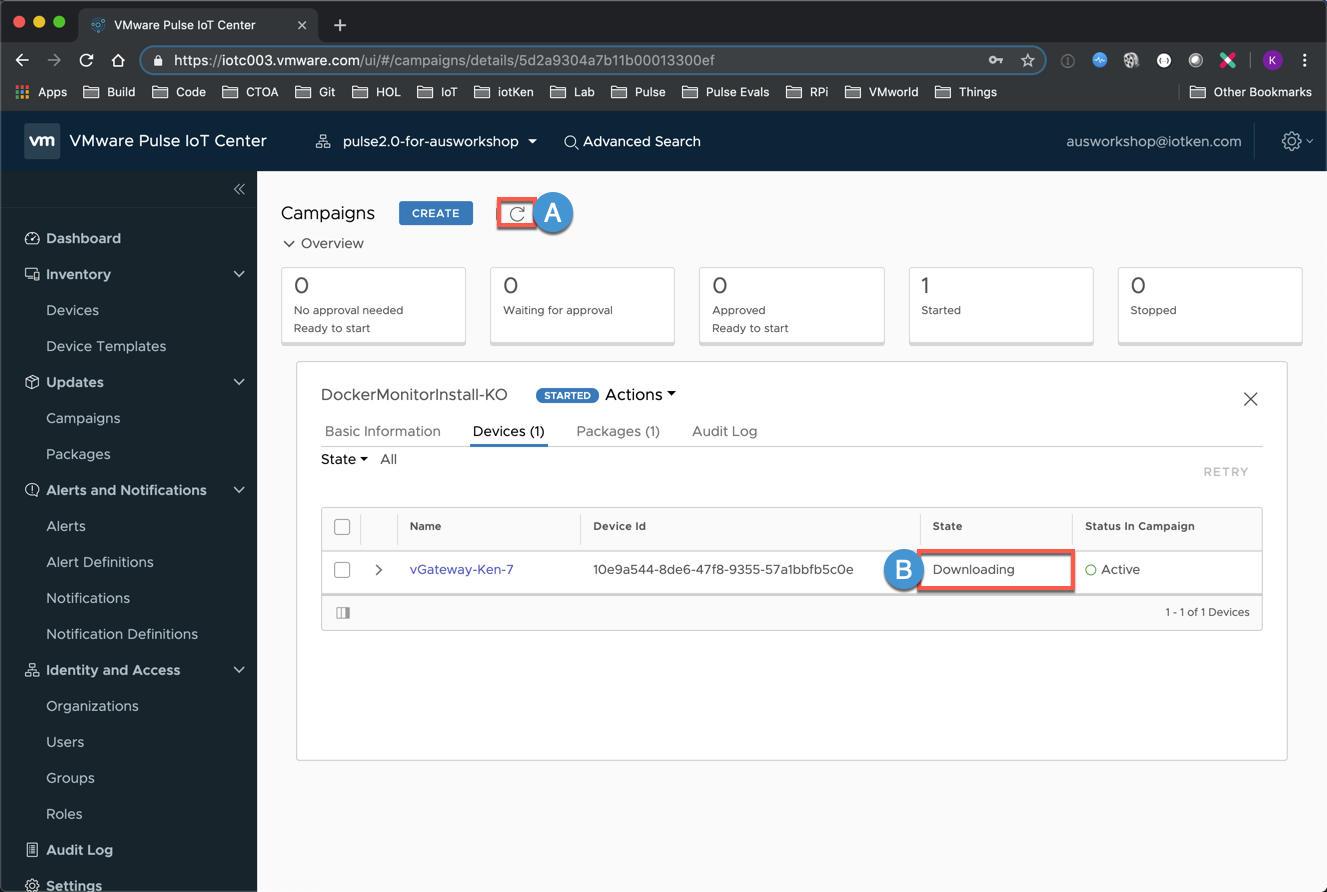
9A Return to the Pulse Console and click the Refresh Icon
9B Note the State descriptor change (as the Campaign cycles through each state)
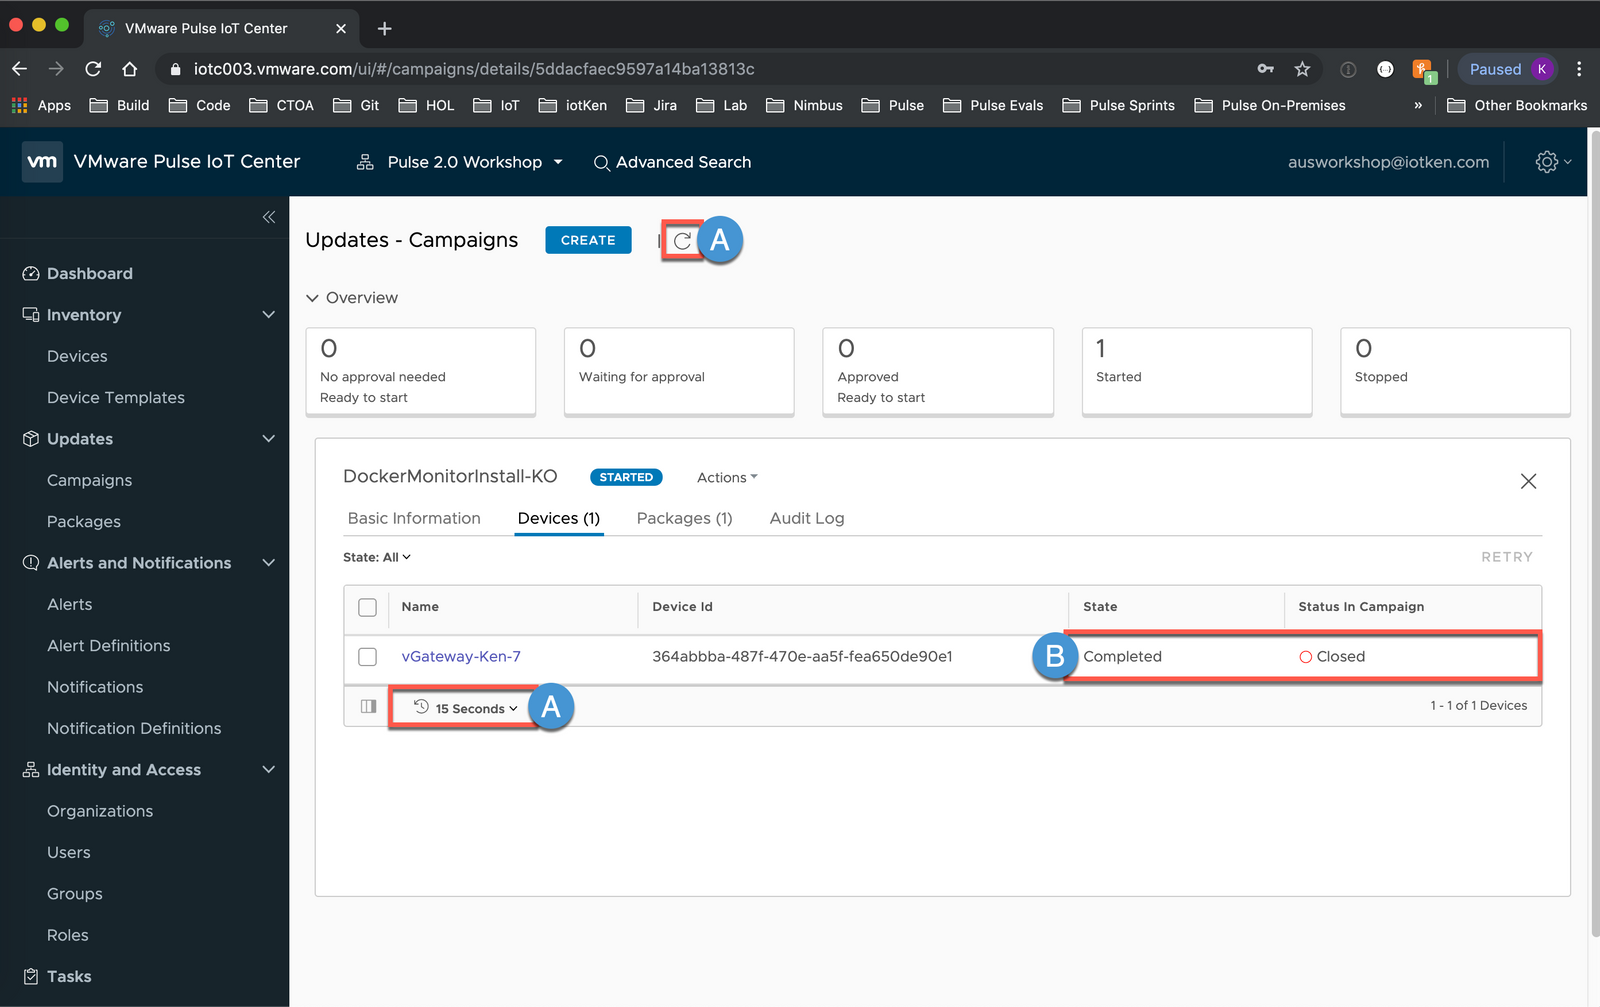
10A You can adjust the refresh interval or manually refresh using the refresh icon (thank you for your patience, the Campaign can take ~5 minutes to finish - good time for a ☕️ break, perhaps?)
10B Monitor until Campaign is in a Completed and Closed state
Docker Monitor
1 Press CTRL-C to exit get-commands.sh script
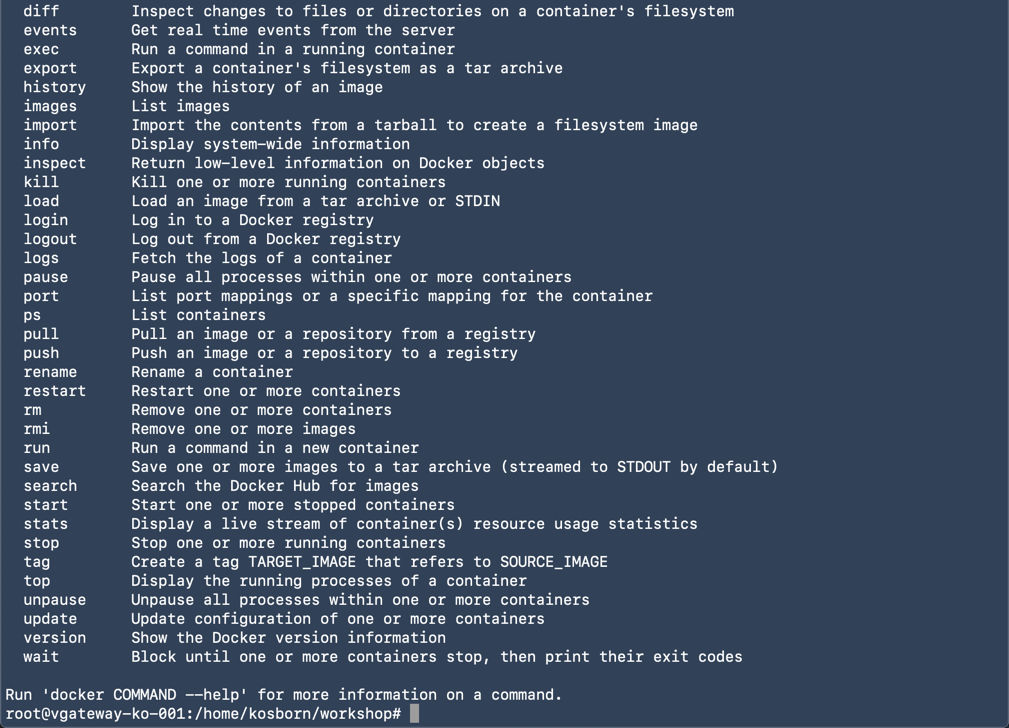
2 Now that the Campaign has completed, let’s check to see if Docker was installed
docker
3 Great! But what about the Docker Monitor script? Let’s see if there is a newly created ‘DockerMonitor’ service
service dockermonitor status

(Press Q or CTRL-C to exit Service Status view)
4 Looks good, the service is loaded and we will start it up in a moment. As a reminder, this service calls our dockermonitor.sh script which automatically enrolls/removes Docker Containers in Pulse.
5 Let’s spin up some new Docker Containers (type or copy/paste the following Docker commands)
docker run -td --name ubuntu ubuntu
docker run -td --name alpine alpine
docker run --name busybox busybox
6 Let’s list out the Containers
docker ps -a

(Note that two of the containers are running and that the busybox container exited - that is because we purposely did not pass in the -td flag at docker run for the busybox container)
7A Start the Docker Monitor Service
service dockermonitor start
8A Return to the Pulse Console and click on your Gateway (vGateway-[YourName]-[Number])
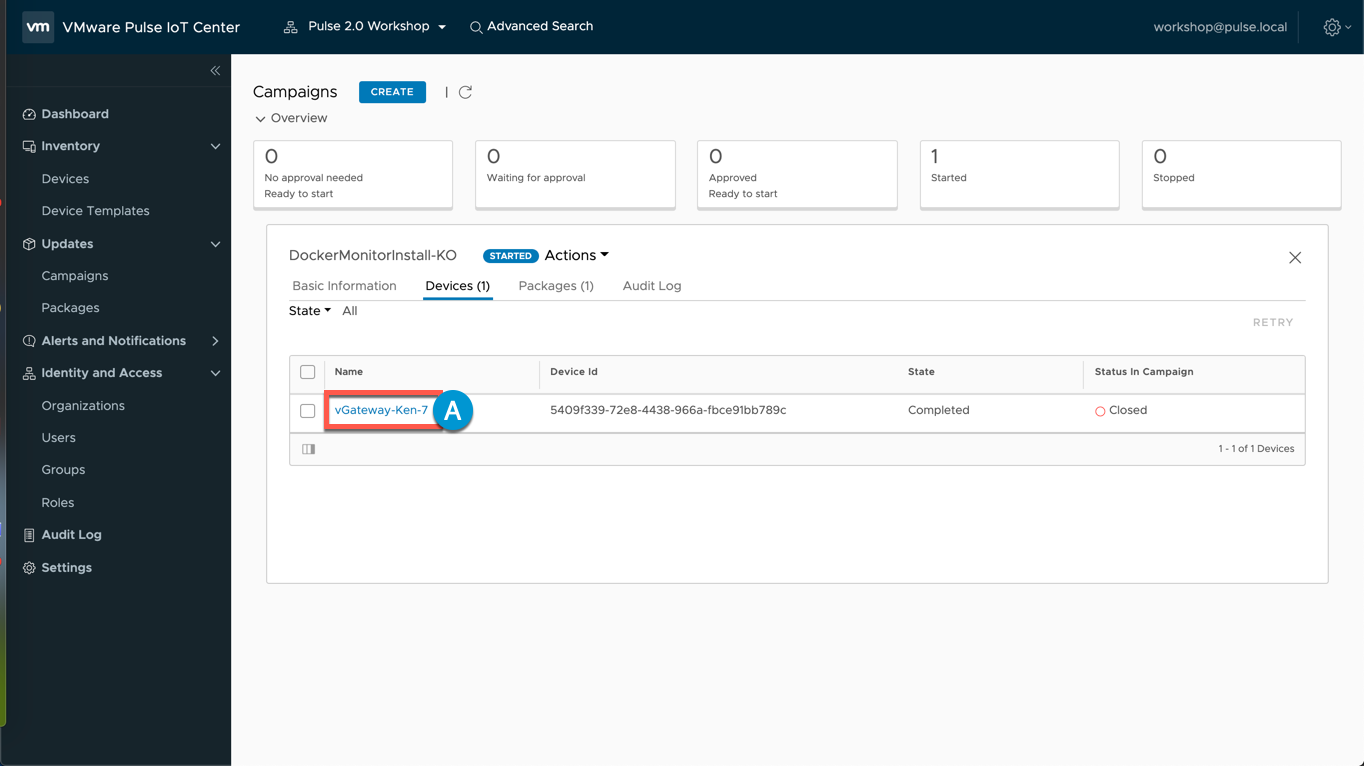
9A Select Properties
9B Notice that we are now indicating whether docker is installed along with the number of docker containers
(Reminder: this information is being fed to the Pulse Console via the dockermonitor.sh script. This script uses DefaultClient --send-metric and --send-properties commands)
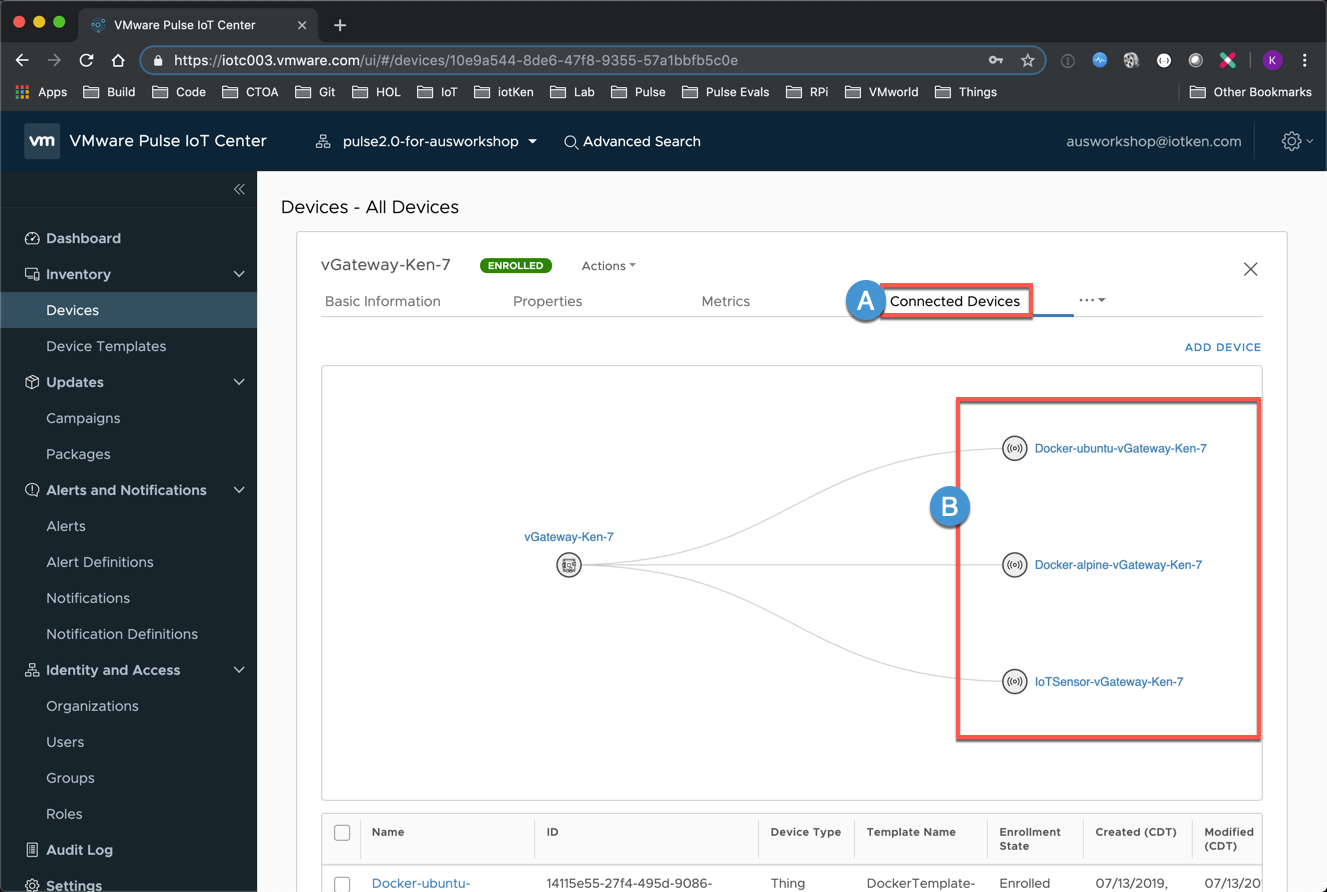
10A Select Connected Devices
10B Notice that your Docker Containers have been automatically enrolled and are visually illustrated as connected to your vGateway.
NOTE: If you do not see your containers then refer to the Docker Monitor Troubleshooting Section (here)
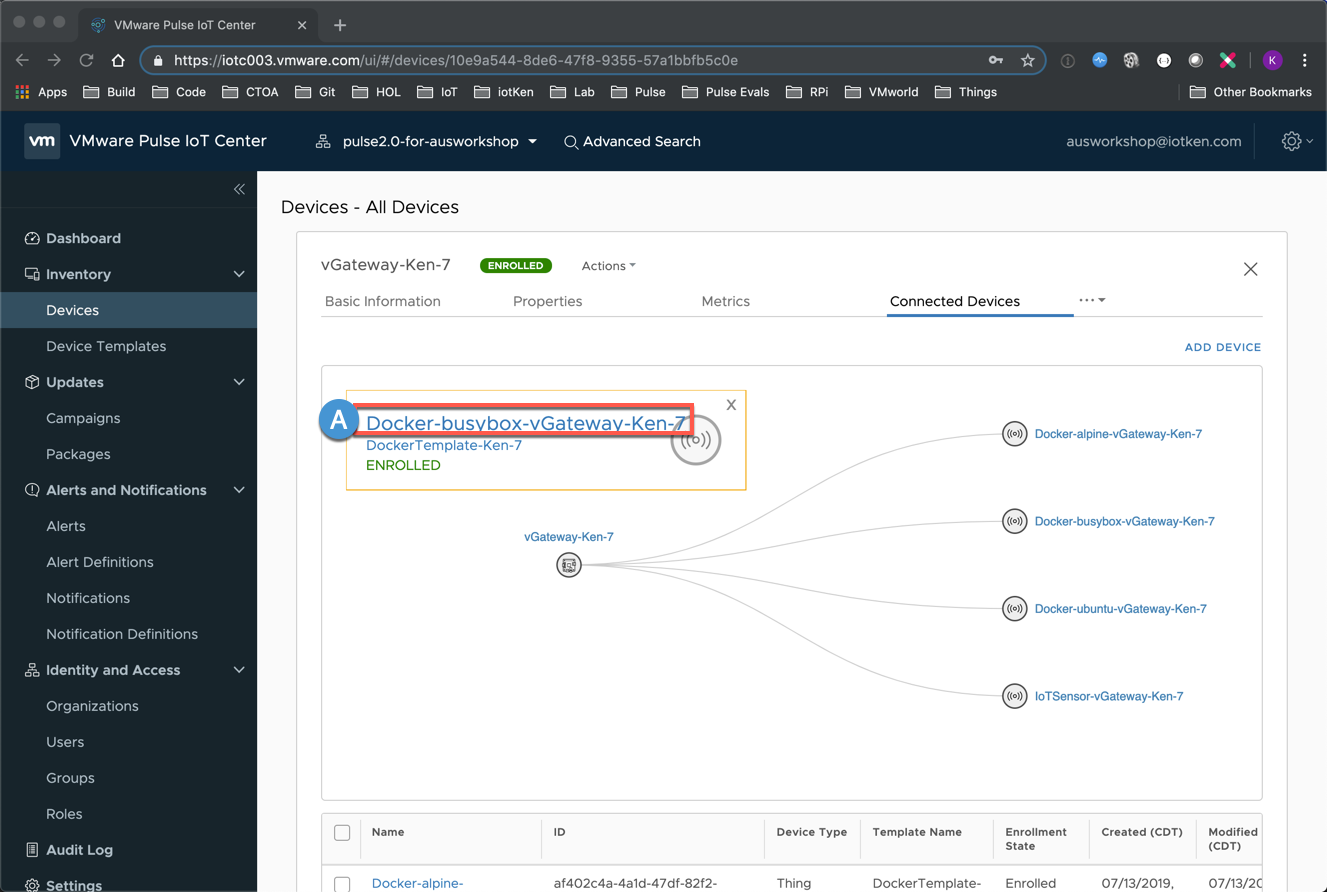
9C Click Docker-busybox-vGateway-[YourName]-[Number]
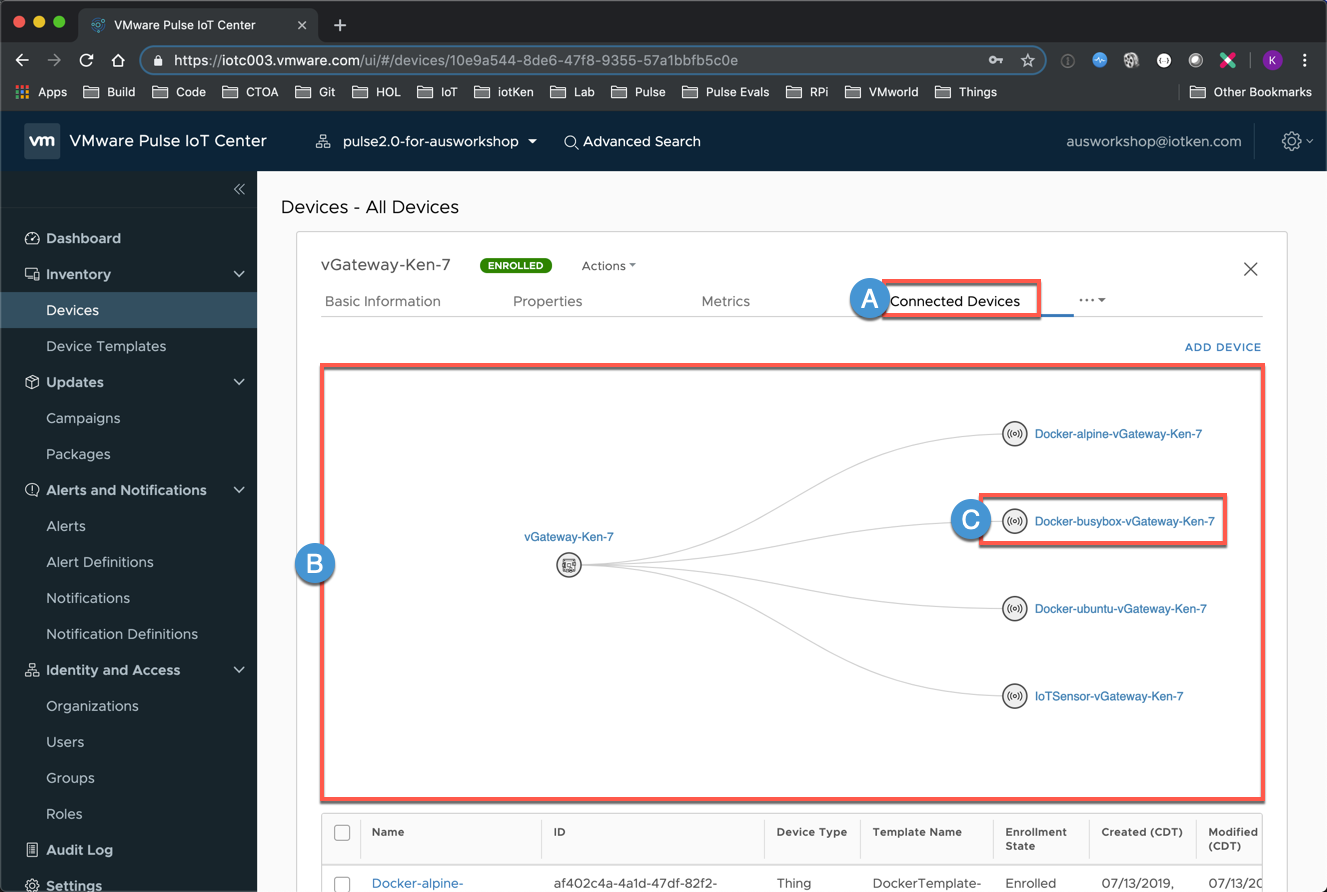
10A Click Docker-busybox-vGateway-[YourName]-[Number]
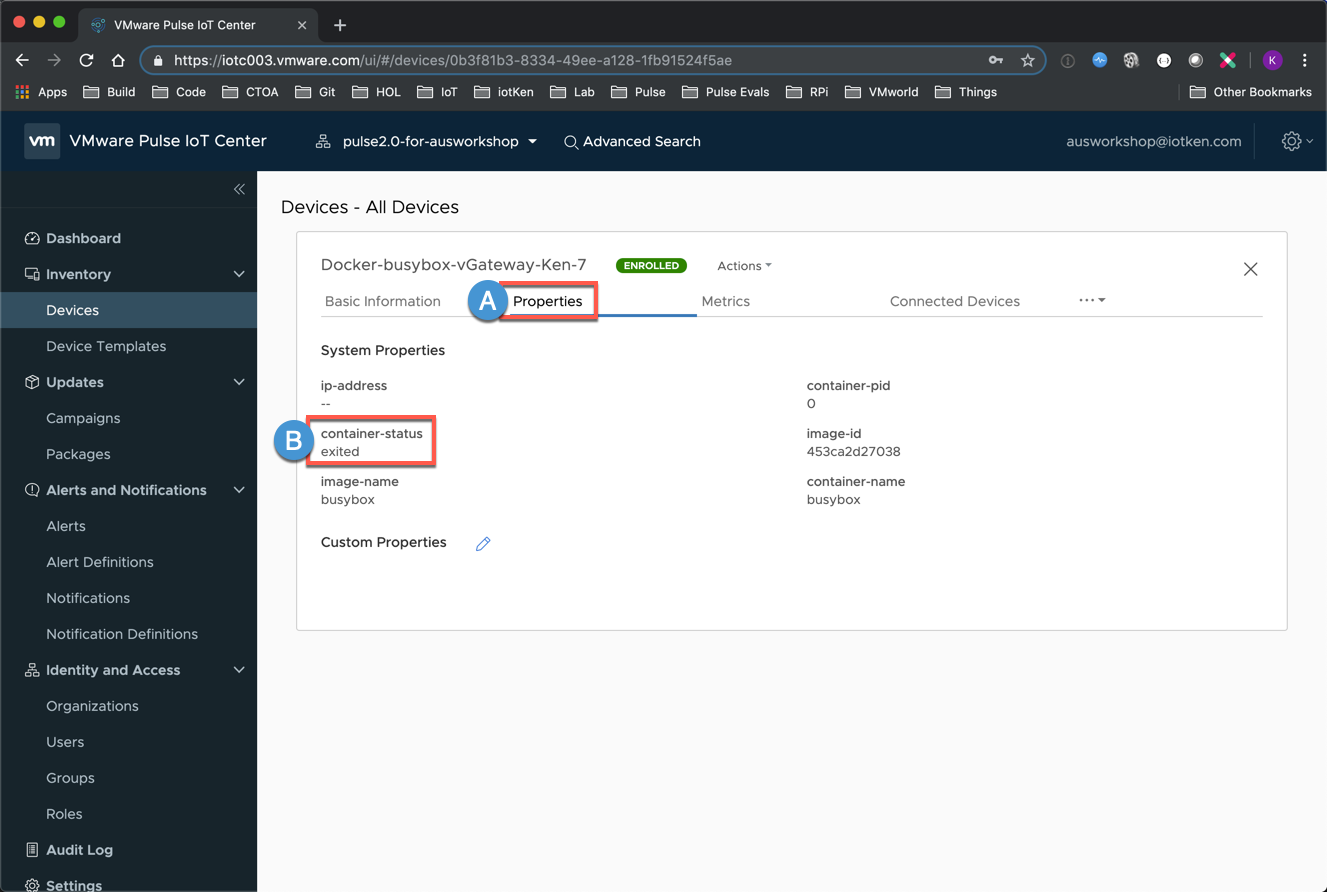
11A Select Properties
11B Notice that container-status is ‘exited’ (this is the Container that we started but did not tell docker to keep running - if we wanted to, we could configure Pulse to send Alerts for any Docker containers that are in this state and not running)
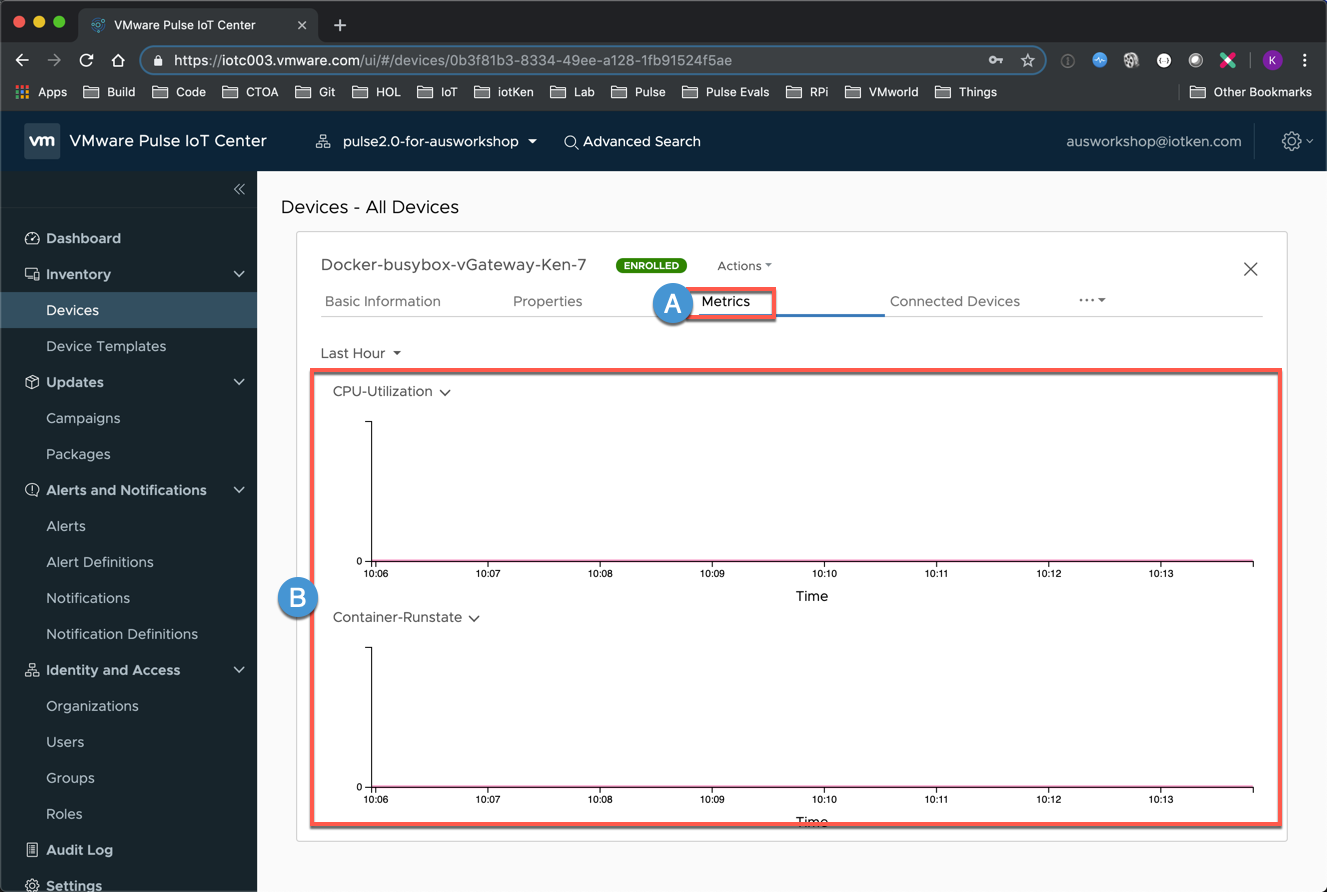
12A Click Metrics
12B Notice that we are gathering time series metrics for both CPU-Utilization and the Runstate (boolean 0/1 values for online or offline). We could collect even more Properties and Metrics if we wanted to. (Note: Your data may not have populated yet as it takes a few minutes for this information to start flowing)
13A For the last step of this lesson, let’s remove the busybox container (return to your SSH Session and issue this docker command):
docker rm busybox

14 Verify that busybox is no longer present when you list docker containers
docker ps -a

15A Return to the Pulse Console and select Connected Devices
15B Notice that the busybox docker container has been removed from Pulse (the dockermonitor.sh script automatically unenrolled the Docker Connected Thing and deleted it the Thing from the Pulse Console using Rest API calls. The Docker Monitor script is running on a 30 second timer so you might not see the container removed right away)
<Thank you - this concludes our ’Manage & Update' Lesson>
Many thanks for working through all of these Lab Lessons. If you have any feedback or comments, please send them to Ken (kosborn@vmware.com) or you can use the Comments box below - Have a Great Day!!
comments powered by Disqus